Tuesday, December 2, 2008

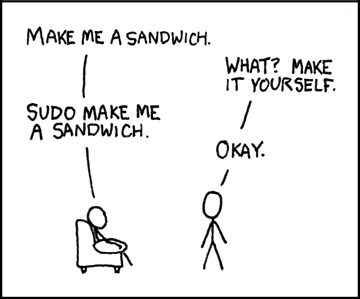
Comic - Huge Software Sale

Huge Software Sale


We can't have all work and no play, so a cartoon every once in a while doesn't hurt. While you're having fun, check out http://www.lifeisnojoke.com.


Here are some articles on where to find free software:

opensource-software-for-windows

searching-for-software

Now, some people may not understand that by free, we mean free. Not pirated, illegally copied, or borrowed. Open source software is free to use, copy, modify and distribute.

A small to medium-sized company may have 100 computers, and have to pay $200 for some kind of office software for each machine for a total of $20,000. But if the company chooses to use free software such as openoffice, the price would be $0.00 x 100 = $0.00.

Freedom Fry — "Happy birthday to GNU"

Mr. Stephen Fry introduces you to free software, and reminds you of a very special birthday.


Freedom Fry — "Happy birthday to GNU"


Published on: http://www.gnu.org/fry/happy-birthday-to-gnu.html

Monday, December 1, 2008

Using the Perl Debugger Interactively


Sometimes you might want to test a few ideas to implement into a perl script, but you want to see if it will work before you implement it. The Perl debugger is perfect for that.

What is the Perl Debugger?

Here is an intro from man perldebug :

If you invoke Perl with the -d switch, your script runs under the Perl source debugger. This works like an interactive Perl environment, prompting for debugger commands that let you examine source code, set breakpoints, get stack backtraces, change the values of variables, etc. This is so convenient that you often fire up the debugger all by itself just to test out Perl constructs interactively to see what they do.

For example: $ perl -d -e 42

Using the Perl Debugger Interactively

To invoke the perl debugger, simply use the -d option, and give it any name, such as "1", in this example. Instead of specifying "-e 1", you could specify a filename to have perl debug the file.

In this case, we want to use the debugger interactively, so we type:


perl -d -e 1


Loading DB routines from perl5db.pl version 1.28
Editor support available.

Enter h or `h h' for help, or `perldoc perldebug' for more help.

main::(-e:1): 1

DB<1> print hello


DB<2> print "hello";
hello

DB<3>

Notice that the correct syntax for print is to use quotes, and terminate with a semicolon ";". The debugger is a quick way to verify simple constructs.


DB<4> test=123
Can't modify constant item in scalar assignment at (eval 14)[C:/Perl/lib/perl5db.pl:628] line 2, at EOF


DB<5> $test=123


DB<6> print $test;
123

DB<7>

Notice that a scalar requires the dollar sign "$" character for both assignment and calling the variable. This is different for shell scripts, where assignment requires no dollar sign, and invocation requires it. Here in the perl debugger, it is easy to test simple operations.

Notice also that this works on any OS where perl is installed. I run this on Windows and linux.


Here it is on RHEL 5:

-bash-3.2$ perl -d -e 1

Loading DB routines from perl5db.pl version 1.28
Editor support available.

Enter h or `h h' for help, or `man perldebug' for more help.

main::(-e:1): 1

DB<1> print "hello";
print "hello";
hello

DB<2>

So, have fun with the debugger. Of course, as is common in perl, there is more than one way to do things. You can combine options

perl -de 1

And, of course there is always the perl one-liner:

-bash-3.2$ perl -e 'print "hello\n";'
hello
-bash-3.2$

Friday, November 28, 2008

How to Find Domain Names with whois_check.sh


The idea to write a shell script is often the result of having to do repeated tasks. Imagine having to check hundreds of domain names by typing "whois domain.com" each time. It would take much longer than writing a simple script.

Using whois to Check for Available Domain Names

Suppose you want to find a good domain name, but you want to see if all of the domain suffixes are available? For example, you want a good .com domain, but you also want the .net, and .org. Not only that, but you might want to use blogspot.com, or wordpress.com for your blog.

You can always check a domain availability by using the whois command, e.g.

$ whois google.com


Obviously, google.com is not available, so whois will display information about the company that registered the domain name. If the domain is not taken, then whois will usually return "No match", or "NOT FOUND". You have to keep trying a domain name until you find one that is available. This can be time-consuming to do manually.

Here is a simple shell script to run a whois query on a list of domains.

First, you will need to generate a list of domains to test. Here is an example file:


$ cat test.txt
unixperformance
unixinsight
unixexpert
unixexpertese
unixstrategies
abczzzzz


For details on how to create a large test file see: mktestfile.sh

Then simply run the script using the .txt file you created as a parameter:


$ ./whois_check.sh test.txt
===============================
unixperformance.net
unixperformance.org
unixperformance.info
unixperformance.blogspot.com
unixperformance.wordpress.com
====== 5 unixperformance =====
===============================
unixinsight.com
unixinsight.net
unixinsight.org
unixinsight.info
unixinsight.blogspot.com
unixinsight.wordpress.com
====== 6 unixinsight =====
===============================
unixexpert.blogspot.com
unixexpert.wordpress.com
====== 2 unixexpert =====
===============================
unixexpertese.com
unixexpertese.net
unixexpertese.org
unixexpertese.info
unixexpertese.blogspot.com
unixexpertese.wordpress.com
====== 6 unixexpertese =====
sleeping 60 seconds...
===============================
unixstrategies.com
unixstrategies.net
unixstrategies.org
unixstrategies.info
unixstrategies.blogspot.com
unixstrategies.wordpress.com
====== 6 unixstrategies =====
===============================
abczzzzz.com
abczzzzz.net
abczzzzz.org
abczzzzz.info
abczzzzz.blogspot.com
abczzzzz.wordpress.com
====== 6 abczzzzz =====


The Script

whois_check -- HTML format

http://www.systemnotes.org/download/shell/whois_check.sh


Friday, October 10, 2008

Find Subnet Mask with ipcalc

An easy way to convert a subnet mask from bit notation (e.g. /24) to dotted decimal notation is to use ipcalc from any linux box. The -m option displays the subnet mask.

$ ipcalc -m 10.10.10.128/25
NETMASK=255.255.255.128
$

O.K., that's fine, you say, but how do I know how many hosts are on the subnet? That's easy enough -- just use the -b option to find the broadcast address.

$ ipcalc -b 10.10.10.128/25
BROADCAST=10.10.10.255

The range of IP's will be from one more than the network address up to one less than the broadcast address. In the example above the IP address range is 129-254. Often the gateway is the first or last address in the range to avoid confusion.

If you don't have access to a linux box, you can always do a google search for "subnet calc," where you can probably find an online subnet calculator.

For the opposite calculation - find prefix from subnet mask, use the -p option.

$ ipcalc -p 10.10.10.128 255.255.255.128
PREFIX=25
$

There you go. You don't need any special software, as ipcalc is probably already installed in /bin. On RHEL5 it is part of initscripts.

On RHEL4
$ which ipcalc
/bin/ipcalc
$ rpm -qf /bin/ipcalc
initscripts-7.93.31.EL-2
$

On RHEL5
$ rpm -qf /bin/ipcalc
initscripts-8.45.19.EL-1
$

Monday, September 15, 2008

Convert a Text File to HTML

While considering how to make my shell scripts look better on the web, I started looking at freshmeat.net for programs that would convert source code to html.

Then I thought, vim already has syntax highlighting. I wonder if it has a way to convert to html.

Sure enough, it can be done with a single command:

:runtime! syntax/2html.vim

Convert Text File to HTML
:runtime! syntax/2html.vim : convert txt to html
:h 2html : help about 2html

:wq! : write the new file

The current file is converted, and an .html extension is added. Once the file is saved, it can be opened in a browser.

For more vi tips, check out:
http://systemnotesorg.blogspot.com/search/label/vi

And the official vim site:
http://www.vim.org/tips,

Here is a beautiful example of C source code that was quickly converted to HTML, while preserving all of vim's color coding:
http://systemnotes.org/download/matrix/matrix.c.html

Backup Logs with a Shell Script


Here is a very simple way to backup and compress subdirectories. Normally you would want to copy them to a remote location in case something happens to the original drive, but in this case the concern is that disk space is filling up.

Suppose you have a program that is generating log files every day, let's say they are key performance indicators (kpi) for some system that you are testing. The log files are pure text, but after a while, they take up a lot of space. One way to compress text is to use gzip, but since tar has an option (-z) to tar and gzip all at once, it may be one of the easiest solutions.


#!/bin/sh

# compress logs in /opt/multicast_kpi/record
# by ScottM, 20080613

# Set variables
TODAY="`date +%m%d%Y`"
ARCHIVE_DIR=/opt/multicast_kpi/record

# move to working directory
cd $ARCHIVE_DIR

# For each subdirectory, make a .tgz file of it's contents, and then delete the originals.
for dir in `ls -1 $ARCHIVE_DIR | grep -v ".tgz" | grep -v "${TODAY}"`
do tar -C ${ARCHIVE_DIR} -czvf ${dir}.tgz ${dir}
# Note that the archive directory is hard-coded here:
# We don't want to use rm -rf just anywhere...
# Even then, we still verify that the directory exists before running rm
[ "${dir}" != "" ] && [ -d ${ARCHIVE_DIR}/${dir} ] && rm -rf /opt/multicast_kpi/record/${dir}
done

# go back to previous directory
cd -

The results will be:

Original
ls -1 /opt/multicast_kpi/record/
20080101
20080102

Zipped
ls -1 /opt/multicast_kpi/record/
20080101.tgz
20080102.tgz

Then the program can continue to create subdirectories of any name, and place log files there. Our script does not care what name the subdirectory has. Of course, as some point the .tgz files may fill up the disk, so that is another problem you will have to deal with.

For more fun, take a look at the logrotate command, which can be used to rotate, compress, and mail system logs.

Thursday, May 29, 2008

How to Copy Directories Using Tar

To copy all files from /usr/local/source to /usr/local/destination, there are several options.

Tar
cd /usr/local/source
tar -cvf - . | (cd /usr/local/destination; tar -xvf -)

This method uses tar, but rather than create a file, it writes to a stream "-" in std output. The stream is piped to another tar command, after changing to another directory.

cp -a

cp -a /usr/local/src/* /usr/local/destination

Other options:

cpio

dd

Wednesday, March 26, 2008

How to install a module from CPAN


perl -MCPAN -e shell
I always seem to forget this simple syntax, so I thought it would be good to post it where I can find it. Where else, my blog -- by the way, this is another excellent use for blogs. Not only do we publish information for others to find, but occasionally a blog is the best place to put frequently accessed info that the author may need. At least I know the source is reliable. :-)

How do I install a module from CPAN?
The easiest way is to have a module also named CPAN do it for you. This module comes with perl version 5.004 and later.

To get a cpan shell, try either cpan:

Linux:

  $ cpan

Windows:

 C:\>cpan

or the more complete command:

$perl -MCPAN -e shell

Terminal does not support AddHistory.

cpan shell -- CPAN exploration and modules installation (v1.7601)

ReadLine support available (try 'install Bundle::CPAN')

cpan>

The first time the command runs, it will prompt for a series of configuration questions.
Now, within the shell, you can install a module
 
 cpan> install Some::Module 

To manually install the CPAN module, or any well-behaved CPAN module for that matter, follow these steps:

  1. Unpack the source into a temporary area.

  2. perl Makefile.PL

  3. make

  4. make test

  5. make install
If your version of perl is compiled without dynamic loading, then you just need to replace step 3 (make) with make perl and you will get a new perl binary with your extension linked in.

Tuesday, February 19, 2008

BCC Howto

Get your Friends to use BCC

Send this link, or the contents of this post, to all your contacts, ...using BCC, of course.

When you receive a forwarded message, reply with a simple message, such as one or more of the following:
  • "Please don't forward any email to me without using BCC. "
  • "Please don't put my email address in the To or CC fields of messages being sent to people I don't know!"
  • "Please protect email addresses as you would unlisted phone numbers."
  • "Please don't forward any email to me with my email address in the To: or CC: fields."
"This is how spam and viruses get spread. See this article for more details -- BCC HOWTO "

What is BCC?

BCC (Blind Carbon Copy), is the practice of sending an e-mail to multiple recipients without disclosing the complete list of recipients. Unlike addresses in the To: or CC: fields, addresses in the BCC: field cannot be seen by other recipients.

Reasons to use BCC

Privacy - Sometimes a business may not want to make it's list of clients available to everyone, and sometimes a reply by anyone on the list would not be appropriate for everyone to receive.

Tracking - You may want to BCC yourself to make a copy, or a colleague to keep them informed.

Respect for your recipients - A forwarded message will often contain long lists of emails that were previously CC'd. This is useful to spammers, and very annoying for your recipients, because in the very near future they will also start receiving spam, and possibly viruses, thanks to your carelessness.

If you must forward a message, BCC is the best way to respect your recipients' privacy. Also remember to remove any email addresses within the message.

Avoid Mail Storms - If you send mail to a large list of users, someone may use "reply all". That in itself may not be too bad, but then someone else might also reply all, and before you know it everyone is replying, and some are using reply all to ask people not to use reply all. This can go on for hours or days, and be very distracting for all users on the list.

How To use BCC

1) Check the help menu or other documentation to make sure the option is enabled.

In Outlook
a) Start a new message
b) From the Menu, select "View"
c) Select "BCC Field"
The Field should now appear under the To, and CC fields.

In Outlook Express
a) Start a new message
b) From the Menu, select "View"
c) Click on "All headers"
The Field should now appear under the To, and CC fields.


2) Enter addresses into the BCC: field, instead of the To:, or CC: field.

How to use BCC in Yahoo Mail Classic

Why would you be asked to use BCC?

When people complain about things you forward, it is usually

  1. because of the content
  2. because of the potential for spam and viruses (you are forwarding their email address to everyone)

Complaint 1) "the content" is usually much less annoying than Complaint 2) "the potential for spam and viruses", and the fact that you are giving out the email address of your recipients with no regard for their privacy. The content is irrelevant. The main problem is that the recipient email addresses are not protected.

It is very simple to use BCC, so the next time you forward a message, stop and think...Check out the validity of the information on snopes.com,  then use BCC, if you still think sending the message is the best choice.


Related links


http://en.wikipedia.org/wiki/Blind_carbon_copy

http://www.cs.rutgers.edu/~watrous/bcc-for-privacy.html -- BCC for Privacy!

US-CERT -- Benefits of BCC

http://www.tech-recipes.com/rx/2149/vista_mail_BCC_blind_carbon_copy

How to Use BCC

How to Use BCC in Yahoo Mail

Tuesday, February 5, 2008

Sudo Make me a Sandwich

You may have seen this artwork around the office where Unix / Linux geeks hang out.


This is where you can find it:
http://xkcd.com/149/


Powered by ScribeFire.

Tuesday, January 15, 2008

Notes from Ubuntu 7.10 Live CD

Every once in a while, I like to try a few live CD's to see how the distros are progressing. I am happy to report that Ubuntu is getting more usable with each release. I titled this "Notes from..", rather than "Notes about", because I was able to work within a live CD session, and save my files.

I admit I wasn't very impressed with the first version of Ubuntu I looked at. That was version 4.1, which I got in live CD format from a local linux user group meeting. After realizing that I couldn't read my NTFS partitions, I played a few games, and quickly lost interest. Also, I had a slower laptop at the time, and having the os frequently read from the CDROM made the experience slightly annoying. Now with a faster CDROM drive, and all the updates, the system is quite pleasant to use.

Getting Started

Using a boot CD is quite easy, and does not require anything to be installed to the hard drive. The entire operating system can be booted from a CD, and run within memory. Then when you are finished exploring, you can simply remove the CD and reboot to the previously installed OS.

Here are the steps for those who are not familiar with the process.

1.) Find a Distribution

In this case:
http://www.ubuntu.com/getubuntu/download

2.) Download the .iso file
3.) Burn it to a CD
4.) Boot from the CD

More info here:
how-to-get-started-with-linux.html

First Impressions

I was pleasantly suprised to find that my NTFS partition was not only readable, but it was also writable. Not only that, but it was already mounted. I looked under /media, and saw that drive C: was mounted there as /media/disk. Of course the "disk" icon is available for use within the gnome desktop, as well.

I tried Ubuntu 7.10, and Fedora 8 live CD, and neither one mounted my NTFS partition on the older IBM T41 laptop, but the newer T60 model was fine. I just was not aware that the NTFS read/write abilities had come this far. That may not be too exciting to you, if this is the first time you are looking at a live CD, but I remember the first rescue disks (floppy and later CD) took a long time to be able to read from, much less write to NTFS partitions.

Minor Annoyances

With a redhat background of more than 10 years, I became accustomed to certain defaults which were not there in the ubuntu live CD. I wouldn't call them problems, but there were a few things that didn't work as expected. Of course this distro seems to be designed more for the common user than the sysadmin, so I don't expect it to look like a geeky distro such as rhel (redhat enterprise linux).

I quickly noticed that some of my customizations were missing. -- e.g.

  • Redhat has the option to launch a terminal by right-clicking on the desktop. Since Ubuntu uses gnome, I was expecting the same option, and was disappointed that it was not there. I always add a terminal to the panel, since that is what I use most often, so I just dragged one out of the menu.
  • Also, typing ll didn't do me much good until I added an alias. Redhat adds the alias by default.
ubuntu@ubuntu:/media$ alias ll='ls -l'
  • The time zone was set to UTC, but that is to be expected from a live CD. It is easy enough to change by right-clicking on the calendar, and selecting "Adjust Date & Time."
  • I still don't like the ugly brown background on the desktop.
  • I would prefer that the documentation point to local documents, rather than ubuntu.com

Nice Features


  • Windows Partitions mounted by default

  • Network Connectivity works by default

  • Firefox is included

  • Open Office is installed

  • pidgin (instant messaging) is installed, and already on the task bar

  • It just works!

It was very nice to be able to boot, and be productive immediately. Since we are increasingly able to perform much of our work on the internet, the OS becomes less important. Windows becomes slower as it gets infected with spyware, viruses, and even security patches. It is nice to have an alternative way of getting work done, rather than being tied down to an OS that doesn't seem to cooperate. After all, that's what GNU / Linux is all about -- free as in freedom -- http://www.fsf.org/.

Conclusion

Well, that's my quick look at Ubuntu desktop. It is definitely usable from the CD, but it will take a bit of tweaking to be able to save settings. I look forward to playing the the server, which is also based on Debian. With this release, I have to agree with the product description -- Ubuntu 'Just Works'. Give it a try, and let us know what you think...

Friday, January 11, 2008

Simple cdrecord Wrapper Script

This little shell script is a good example of how to simplify a task with a wrapper script. Rather than trying to remember which settings to use for cdrecord, I just run my cdroast.sh script.

----- begin script -----


#!/bin/sh
# cdroast.sh
# scottm, 2005-07-20
# wrapper for cdrecord

INPUT=$1

if [ $INPUT ]
then
cdrecord -v -sao dev=0,0,0 $INPUT

else

printf "\nEnter name of file\n"
printf "e.g. $0 filename.iso\n\n"
fi


----- end script -----

Now, with the script in my path, all I have to type is:

$ cdroast.sh myfile.iso

and the burn process will start.

This type of script is often called a wrapper, since it wraps a simple script around a more complicated procedure.